Tuesday, March 30, 2010

Welcome to Shimmerz, Liz!!!


We have some exciting things happening at Shimmerz! Welcome to Liz Kartchner!!! She is the newest Face of Shimmerz!!!
She is excited to become a Shimmerz Endorsed Instructor and will be using Shimmerz Products in her upcoming classes!
Liz writes a monthly column for Creating Keepsakes Magazine called "Dear Lizzy", she wrote the book "52 more Scrapbooking Challenges" and has a fun Craft Line called "Dear Lizzy" from American Crafts.
To learn more about Liz you can check out her inspiring Blog Here.

Lots of Zva Creative, Pink Paislee, and Shimmerz Spritz

I pulled out the Amber Road collection by Pink Paislee and lots of Zva Creative goodies to create this page of my daughter, Maryn. She was wearing her church dress and so I wanted to create a page with a warm and elegant feeling.


I used Shimmerz Licorice Spritz to give the silk butterfly and Canvas brads an aged look. When the brads had dried I pressed them into a stamp by Pink Paislee to add a bit of pattern to them. LOVE the way they turned out!

Supplies: Black Crystal Flourishes, Silk Butterfly, Silk Flowers, Felt Flowers, Crystal Brad, Canvas Brads, and Crystal flower center are all by Zva Creative . Patterned Papers, Acrylic Stamps, Chipboard Letters by Pink Paislee . Spray Ink is Licorice Spritz by Shimmerz Paints .

I learned something on this page that I thought I would share with you. :)

When I first completed this page it looked like this.


I kept staring at that BLANK corner in the top left . . . and I knew it needed "something" but wasn't quite sure what to do. I thought, "Wouldn't it be great if I had another red butterfly to go there?" But I didn't. :( Sooooo, I decided to improvise. I used another butterfly (a different color) as a mask with my Shimmerz Licorice Spritz . It worked like a charm! Filled that corner right up and made the red butterfly feel like it was floating upwards. YAY!

AFTER


So next time you only have one embellishment and you wish you had two . . . try using it as a mask! Super fun! :)

Thanks for popping by!

Monday, March 29, 2010

Make Your Own Background Papers

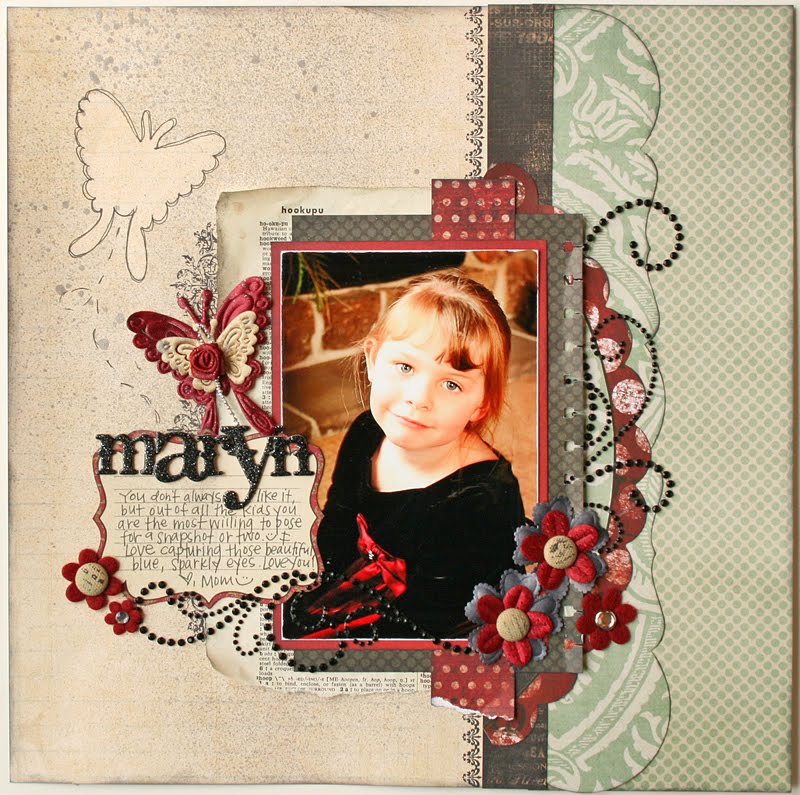
Today is my turn to post a Tip & Technique on the Noel Mignon Layout blog. This time I decided to demonstrate a couple of ways to create your own background patterns. Can you spot the two techniques I used on this page? :)


First, I pulled out my Sea Monkey Vibez by Shimmerz Paints. We're all familiar with misting our cardstock, . . . this time I will be using a mask to create a pattern on my page.

I used my Silhouette to out a large polka dot pattern to use as a stencil. If you don't own an electronic cutting machine you could also create a polka dot pattern using the grommet punch by Making Memories.


Lightly tape your pattern to your cardstock. Use additional sheets of paper or paper towels to cover up the exposed edges of cardstock sticking out past the edges of your mask. Covering the edges will ensure that you won't get a line of "overspray" while you are misting. Spritz the openings with your Vibez spray ink. If you need to, move and line up your pattern around the page until you reach the desired result.


For my second technique, I decided to use acrylic stamps to create my own patterned paper.

First, I created a document on my computer that looks like a large scale sheet of graph paper. I used the "hairline" line thickness at 20% opacity in a grid across the entire sheet. The lines are spaced 0.5" apart. Print your graph onto white cardstock. You will be stamping directly onto this sheet. The grid marks will help you keep your pattern straight and even.


Next, choose one or more stamps to work with. I chose the spikey flower stamp from a stamp set by My Cute Stamps called "Spunky Nature". The ink pad I used is by My Mind's Eye. I stamped directly on top of the grid, using the lines to position my image. When the design is complete, the graph underneath will be barely noticeable. Now you are ready to incorporate your custom patterned paper into your next papercrafting project!


And here is my completed page! Everything else on this page is from the NEW Sonoma County Kit . There are just a few left! Pick yours up in the Noel Mignon online store HERE . (Click on any image to view larger.)


Thanks for coming by today!
See you soon!
Jana

Sunday, March 28, 2010

Warming Up!

Have you been wondering where in the world I disappeared to? :) We drove to southern Utah for a few days to warm up. We were completely lazy . . . and you know what?! It felt GREAT!

We took time to stop and smell the flowers . . .


To try and catch a lizard . . .


Do some swimming . . .


(I apologize the pictures are a little blown out . . . I was practicing with my Manual settings. *blush*)


And explore nature.


It was beautiful! I'm so grateful we had the chance to sneak away and spend some time reconnecting as a family. :)

Don't worry. I've been scrappin, too. ;) I'll be back soon to share!

See you then!
Jana

Wednesday, March 24, 2010

Cuttlebug Be Inspired #76

This week at the Cuttlebug Challenge Blog our prompt was to use stamps in an Easter project. I decided to create an Easter Layout using the Noel Mignon Seaside cottage kit and the "Jelly Beans" stampset by My Cute Stamps . (Click on any of the images to view larger.)


The layer behind my photo was created using the Script Texture embossing folder. Before placing my cream cardstock into the folder to emboss it I spritzed the folder with Treasured Hymn Spritz, Copper Penny Vibez, Hot Fudge Vibez, and a bit of Licorice Spritz (by Shimmerz Paints ). I love how the colors mixed and settled into the recessed parts of the pattern emphasizing the texture.

I then added a splash of pink at the top by placing a butterfly punch on the cardstock as a mask and then misted over the corner with Bed of Roses Spritz by Shimmerz Paints . It was just enough pink to help the cardstock tie in with the rest of the page. :)


I stamped the sentiment from the My Cute Stamps "Jelly Beans" set onto a tag. I used a stamping marker to color portions of the saying one at a time, so I could space the quote out on my tag to make it fit. I stamped the bunny, carrot and easter egg onto cream patterned paper and then used Shimmerz Paints lightly on the portions of the image that I wanted a little color.


The pearl accents on the banner, the pearl curly line beneath the rabbit, and the pink icy blossom are all by Zva Creative . They are the perfect dimensional details that add a bit of Easter elegance to this page. :)


And for my sketch friends out there, I have created a sketch to go along with this page. Lots of layering on this one. Enjoy!


I hope you are having a great week!
Talk to you again soon!

Jana

Friday, March 19, 2010

My Crop Challenge - Use Clipart!

Today kicks off the Swing Into Spring Crop at Noel Mignon ! This morning I posted my challenge and thought I would share it with you here as well. --Come play along if you can! :) --

I am constantly bookmarking pages on the web and downloading cute clipart that I just KNOW would be darling on a scrapbook page . . . BUT! I never make the point to USE it. So guess what?! TODAY is the day! I challenged myself and I am challenging YOU to use that clipart on your next scrapbook page. :)

Here is what I created.


The papers and journal spots are from the Noel Mignon Core Curriculum kit. The Flocked Chipboard alphas are by My Mind's Eye and the blue buttons are from my stash.

The Paper Doll girl clipart was obtained from THIS WEBSITE . (Thanks to Greta Adams for hooking me up with that find!) And those darling LEDGER CLOUDS were a freebie from MELSTAMPZ (She's an amazing crafter. Be sure to check out more of her blog when you get a chance) .


This was such a fun page to do! I definitely need to use clipart more often on my pages. Come check out my challenge thread on the Noel Mignon forum . . . I have posted lots of free clipart and printable links to get you started.

Also, TONIGHT is BINGO NIGHT! Don't forget! ;)


I hope to see you there!
Jana

Wednesday, March 17, 2010

Zva Creative & Cuttlebug #75

For the Cuttlebug Be Inspired #75 Challenge I decided to add a bit of "Spring" to my page with some butterflies. :) I punched a few butterflies from clear packaging and them embossed them using the Script Texture folder. They are subtle but add a lot of dimension to this page.


The gorgeous patterned papers are by My Mind's Eye and all the gorgeous jewels are from Zva Creative.


********************************

Also, wanted to let you know that the full kit picture and description is up for the NEW Noel Mignon kit. CLICK HERE to check it out! :) This one says Fresh and Spring to me! And it has all of my favorite manufacturers in it! Pink Paislee, My Mind's Eye, Crate Paper, Cosmo Cricket and more!


Also, this weekend at NoelMignon.com is our Swing Into Spring Crop! Please join us for challenges, games, and prizes!


Friday kicks off the weekend, and that night I will be hosting a Bingo Game! Stop by the forum to find the list of words and details of how to sign up to play.


Hope to see you there!

Jana

Tuesday, March 16, 2010

Cone-Shaped Carrot Treat Holders

It's finally starting to feel like SPRING! The birds are chirping, the sun is shining, and the world is beginning to wake up from it's winter sleep!


To Welcome Spring! I thought it would be fun to make cone-shaped Carrot Treat Holders.

You will need:
Orange Cardstock
Green Patterned Paper
Cuttlebug & Embossing Folder
Pinking Shears
Double Sided Sticky Tape
Ribbon
Tag
Flowers
Button
String


First, trace a circle onto the orange cardstock.


Next, cut the circle into four equal sections.


Emboss your cardstock using the Cuttlebug and desired embossing folder. I chose to use the Swiss Dots folder. Trim the curved edge of your circle section with pinking shears.


Adhere double-sided sticky tape to the edge of the cone and roll up into a cone shape.


Cut a piece of green patterned paper into a 6" X 8" rectangle. Gently roll into a tube and cut into one end every 1/4" to create fringe. Leave about an inch along the bottom to attach to your carrot cone.


Line the inside top edge of your carrot cone with double-sided sticky tape. Slide the 1" uncut section of the green patterned paper tube into the carrot and attach firmly using your fingers to press down and secure it into place.

Fill the cone with your treat. Gather the fringe together and tie closed with a length of ribbon. Decorate a tag with flowers and button. Tie around the carrot. And there you have it! A fun treat to hand out to family and friends! :)


Thanks for coming by!
Jana

Subscribe to My New Blog

Just wanted to pop in here to let you know that you can now SUBSCRIBE to my new blog by clicking on the link below. Subscribe in a reader ...